
Chapter05_Generate a Report using Crystal Reports in Visual Studio 2010.pdf

Generate a Report using Crystal Reports in Visual Studio 2010
Since a long time, Visual Basic and Visual Studio have Crystal report with it. People are saying that since 1993. But in VS2010, they excluded Crystal reports. Yes, what you just heard is right, Crystal Report has been dropped from Visual Studio 2010. But don't worry, it is available as a separate download from the SAP web site. These are the things that I found from the internet.
'It turns out that Crystal Reports for Visual Studio 2010 will be released separately, instead of included with the product and Most importantly, Crystal Reports for Visual Studio 2010 will continue to be free, with no registration required.'
Download Crystal report from this link, or just directly paste the link below to your address bar and it will ask to save an EXE file. http://downloads.businessobjects.com/akdlm/cr4vs2010/CRforVS_13_0.exe
Introduction
In this article, I will show you simple report creation process with screenshots. A picture is worth more than a thousand words, so I always believe in an article with screenshots.
Let's start by creating a new Windows Forms Application in VS2010. See the following screen:
Figure 1
As per figure 1, create a new Windows Forms Application in VS2010 and name it as per your choice.

Figure 2
The above figure shows the db table structure. And the below figure (Figure 3) will show you some sample data in the table:
Figure 3
If you want to run this sample project directly, then you can download the database script from the link at the top.
Now we have to create an xsd file as a blank data source as we are going to use strong data type. Here I will divide this tutorial in 5 sub sections as mentioned below:
• Simple report using Crystal Reporting Tool
• Group report
• Chart report
• Sub report
• Cross tab report
Crystal Report Lab Page 2
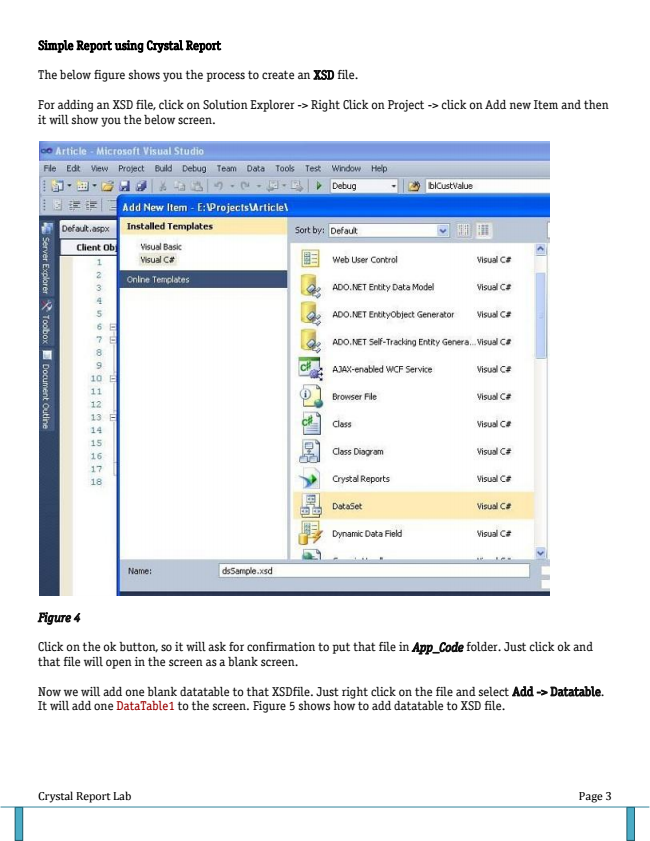
Simple Report using Crystal Report
The below figure shows you the process to create an XSD file.
For adding an XSD file, click on Solution Explorer -> Right Click on Project -> click on Add new Item and then it will show you the below screen.
Figure 4
Click on the ok button, so it will ask for confirmation to put that file in App_Code folder. Just click ok and that file will open in the screen as a blank screen.
Now we will add one blank datatable to that XSDfile. Just right click on the file and select Add -> Datatable. It will add one DataTable1 to the screen. Figure 5 shows how to add datatable to XSD file.
Crystal Report Lab Page 3

Figure 5
Now datatable1 is added to XSD file. Now we will add data column to the datatable1 as per figure 6. Remember whatever fields (columns) we add here, it will be available to show on the report. So add column which you want to display in your reports one by one here.
Figure 6
Remember to give the exact same name for data column as in database and also select data type which is the same as database, otherwise you will get an error for field and data type mismatch.
Crystal Report Lab Page 4

Once we add all the required columns in datatable, then set property for the datacolumn as it has in database. The below figure will show you how to set property for data columns. Default datatype for all the columns is string here so if datatype is other than string then only change it manually.
Just right click on the datacolumn in datatable and select property and from property window, select appropriatedatatype from DataType Dropdown for that datacolumn.
Figure 7
That's it. XSD file creation has been done. Now we will move to create Crystal report design.
Just click on the Solution Explorer -> Right click on the project name and select crystal reports. Name it as per your choice and hit the add button.
Figure 8 will show you the creation process of Crystal reports.
Crystal Report Lab Page 5

Figure 8
Click on the add button and one .rpt file will be added to the solution. And also, it will ask for the report creation type of how you want to create the report. Figure 9 will show you a screenshot.
Figure 9
Crystal Report Lab Page 6

Just click ok button to proceed. It will lead you to figure 10:
Figure 10
Under project data, expand ADO.NET Datasets and select DataTable1 and add to the selected table portion located at the right side of the windows using > button.
Now click on the Finish button and it will show the next screen (Figure 11):
Crystal Report Lab Page 7

Figure 11
Once report file is added, you can see Field Explorer on the left side near server explorer.
Expand Database Fields, under that you will be able to find Datatable that we have created earlier. Just expand it and drag one by one filed from Field Explorer to the rpt file under detail section.
Now the report design part is over. Now we have to fetch the data from database and bind it to dataset and then bind that dataset to the report viewer.
Let's go step by step.
First Drag a CrystalReportViewer control on aspx page from tool box as per below screen:
Figure 12
Now we will fetch the data, pass data to the dataset and then add that dataset to the Crystal Report. Below is the VB.NET code which will do the job:
Imports System.Data.SqlClient Imports CrystalDecisions.CrystalReports.Engine
Crystal Report Lab Page 8

Below is the final code for reports:
Function getAllOrder() As DataTable
Dim cnn As New SqlConnection("server=localhost; database=GSM_Data;integrated security=true")
Dim cmd As New SqlCommand("select * from tbl_Product", cnn) Dim ds As New DataSet Dim da As SqlDataAdapter
Try
da = New SqlDataAdapter(cmd) da.Fill(ds, "tbl_Product")
Catch ex As Exception
MessageBox.Show(ex.Message) Finally
cmd.Dispose() End Try
Return ds.Tables(0) End Function
Private Sub Form1_Load(ByVal sender As System.Object, ByVal e As System.EventArgs) Handles MyBase.Load
Dim rptDoc As New ReportDocument Dim ds As New DataSet1 ' .xsd file name Dim dt As New DataTable
'Just set the name of data table dt.TableName = "Crystal Report Sample" dt = getAllOrder() ds.Tables(0).Merge(dt)
Dim path As String = Application.StartupPath.Substring(0, Application.StartupPath.Length - 10) 'Get default path of created report
'set .rpt file path will be below rptDoc.Load(path & "\CrystalReport1.rpt")
'set dataset to the report viewer rptDoc.SetDataSource(ds) CrystalReportViewer1.ReportSource = rptDoc
End Sub
Now just save everything and run report. It will look like the below figure:
Crystal Report Lab Page 9

Figure 13
Grouping in Crystal Report
Here we will see only report design and rest of the things, you can refer from Section 1. Here we will group Customer,Product, Order and Quantity. For details, just go through Figure 14.
Just add a report (.rpt) file to the solution. Select the appropriate dataset from popup window. Once it's done, then select grouping option like figure 14.
Crystal Report Lab Page 10


